
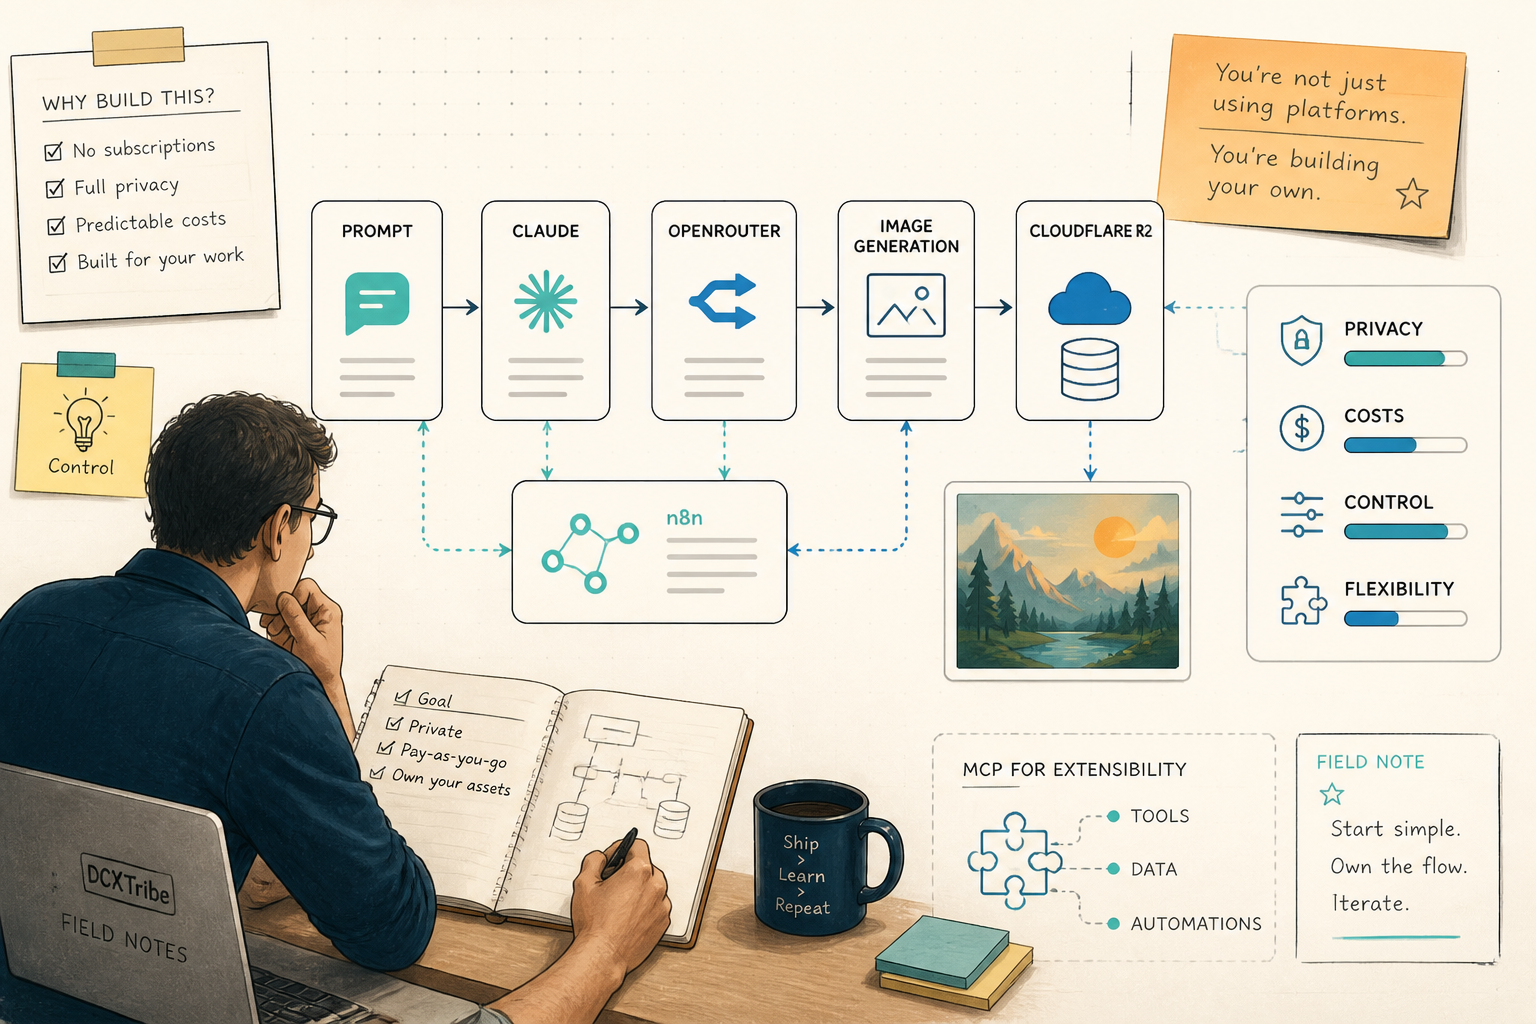
This guide walks you through building a self-hosted image generation pipeline that lets you create AI images directly from Claude chat, store them privately in your own cloud storage, and view them via temporary links — all without a monthly subscription or third-party gallery.
You (in Claude) → n8n workflow → OpenRouter API → image generated
                                                      ↓
                                                  downloaded + uploaded
                                                      ↓
                                                  Cloudflare R2 (private bucket)
                                                      ↓
                                                  presigned URL → view in browser
---
What You're Setting Up
Two n8n workflows connected to Claude via MCP:
- Image Generator — accepts a prompt, calls OpenRouter's API, saves the result to a private Cloudflare R2 bucket.
- Presigned URL Generator — creates a temporary viewing link for any stored image (expires after 24 hours by default).
You pay per image generated (starting at $0.013/image), with no monthly subscription required. Images are stored privately — not searchable, not public, not visible to anyone unless you share a link.
---
Before You Start
1. A Claude account with MCP access (Pro, Team, or Enterprise)
2. An n8n instance connected to Claude as an MCP (self-hosted or cloud)
3. A Cloudflare account (free tier works)
4. An OpenRouter account with API credits (openrouter.ai)
5. Basic comfort with n8n workflow editing (clicking nodes, assigning credentials)
---
Important Safety Notes
Your OpenRouter API key controls your spending. Anyone with access to this key can generate content and charge your account. Never commit it to a public repository.
Set a monthly spending limit on your OpenRouter account (Settings → Limits) as a safety net — even if your security is solid.
Cloudflare R2 buckets are private by default. Images are only accessible via API credentials or presigned URLs you generate. Nothing is searchable or crawlable unless you explicitly make a bucket public.
---
Step 1: Enable Cloudflare R2
Go to dash.cloudflare.com. In the left sidebar, click R2 Object Storage, then Get Started or Enable R2. It asks for a payment method but won't charge you — the free tier covers 10GB of storage with zero egress fees.
You should see: an empty R2 Overview page with no buckets listed.
---
Step 2: Create Your Storage Bucket
You can create the bucket from the Cloudflare dashboard:
R2 → Create Bucket
Name: dcxtribe-generations (or whatever you prefer)
Region: auto (Cloudflare picks the nearest)
You should see: your new bucket listed on the R2 Overview page with 0 objects.
---
Step 3: Create an R2 API Token
R2 → Manage R2 API Tokens → Create API Token
Permission: Object Read & Write
Scope: Apply to specific buckets only → select your bucket
After creation, copy both values immediately:
Access Key ID:      (short string — save this)
Secret Access Key:  (longer string — save this, you won't see it again)
Also note your Cloudflare Account ID — it's in the URL bar: dash.cloudflare.com/<THIS-PART>/...
---
Step 4: Create the n8n Credentials
You need three credentials in n8n. Go to Credentials → Add New for each:
Credential 1: Webhook Auth (Header Auth)
Type:   Header Auth
Name:   X-Auth-Token
Value:  (make up a strong secret string — this protects your webhook)
This ensures only requests with your secret header can trigger the workflow.
Credential 2: OpenRouter API Key
Type:   HTTP Bearer Auth  (or use n8n's native OpenRouter credential)
Name:   OpenRouter API Key
Token:  sk-or-v1-... (your OpenRouter API key)
Credential 3: Cloudflare R2 (S3-compatible)
Type:              AWS (IAM)  — not "Assume Role"
Name:              Cloudflare R2
Region:            us-east-1  (critical — do not use "auto")
Access Key ID:     (from Step 3)
Secret Access Key: (from Step 3)
Custom S3 Endpoint: https://<YOUR-ACCOUNT-ID>.r2.cloudflarestorage.com
The region field is the most common failure point. R2 doesn't use AWS regions, but n8n's SDK needs a valid one for request signing. Use us-east-1. It works.You should see: all three credentials saved with green checkmarks.
---
Step 5: Set Environment Variables for Presigned URLs
In your n8n hosting environment (Coolify, Docker, or wherever n8n runs), add two environment variables:
R2_ACCESS_KEY_ID=your-access-key-id
R2_SECRET_ACCESS_KEY=your-secret-access-key
These are the same values from Step 3. The presigned URL workflow reads them to sign temporary links.
If using Coolify: go to your n8n service → Environment Variables → add both → redeploy.
---
Step 6: Build the Image Generation Workflow
Create a new workflow in n8n with four nodes:
Node 1: Webhook (trigger)
Type:    Webhook
Method:  POST
Path:    openrouter-generate
Auth:    Header Auth → select your X-Auth-Token credential
Node 2: HTTP Request (call OpenRouter)
Type:    HTTP Request
Method:  POST
URL:     https://openrouter.ai/api/v1/chat/completions
Auth:    HTTP Bearer Auth → select your OpenRouter API Key credential

Body (JSON):
{
  "model": "{{ $json.body.model || 'google/gemini-2.5-flash-image' }}",
  "messages": [
    {
      "role": "user",
      "content": "{{ $json.body.prompt }}"
    }
  ]
}
Node 3: Code (extract image)
const response = $input.first().json;
const choices = response.choices || [];
const content = choices[0]?.message?.content || [];

// Find the image block in the response
const imageBlock = Array.isArray(content)
  ? content.find(c => c.type === 'image_url')
  : null;

if (!imageBlock) {
  throw new Error('No image returned from OpenRouter');
}

const base64Data = imageBlock.image_url.url.replace(
  /^data:image\/\w+;base64,/, ''
);
const filename = `img-${Date.now()}.png`;
const buffer = Buffer.from(base64Data, 'base64');

return [{
  json: { filename },
  binary: {
    data: {
      data: buffer.toString('base64'),
      mimeType: 'image/png',
      fileName: filename
    }
  }
}];
Node 4: S3 Upload
Type:        AWS S3
Operation:   Upload
Bucket:      dcxtribe-generations
File Name:   images/{{ $json.filename }}
Binary Data: data
Credential:  Cloudflare R2
Node 5: Respond to Webhook
Type:    Respond to Webhook
Body:    { "status": "ok", "file": "images/{{ $json.filename }}" }
Wire the nodes in sequence: Webhook → HTTP Request → Code → S3 Upload → Respond.
Assign the credentials to each node (this must be done in the n8n UI — it cannot be automated).
---
Step 7: Build the Presigned URL Workflow
Create a second workflow:
Node 1: Webhook
Method:  POST
Path:    r2-presigned-url
Auth:    Header Auth → your X-Auth-Token credential
Node 2: Execute Command
node -e "
const crypto = require('crypto');
const key = '{{ $json.body.key || 'images/test.png' }}';
const bucket = 'dcxtribe-generations';
const region = 'auto';
const accessKey = process.env.R2_ACCESS_KEY_ID;
const secretKey = process.env.R2_SECRET_ACCESS_KEY;
const accountId = 'YOUR_ACCOUNT_ID';
const host = accountId + '.r2.cloudflarestorage.com';
const expires = {{ $json.body.expires || 86400 }};
const now = new Date();
const dateStamp = now.toISOString().replace(/[-:]/g,'').split('.')[0]+'Z';
const shortDate = dateStamp.slice(0,8);
const scope = shortDate+'/'+region+'/s3/aws4_request';
const canonical = 'GET\n/'+bucket+'/'+key+'\nX-Amz-Algorithm=AWS4-HMAC-SHA256&X-Amz-Credential='+encodeURIComponent(accessKey+'/'+scope)+'&X-Amz-Date='+dateStamp+'&X-Amz-Expires='+expires+'&X-Amz-SignedHeaders=host\nhost:'+host+'\n\nhost\nUNSIGNED-PAYLOAD';
function hmac(k,d){return crypto.createHmac('sha256',k).update(d).digest();}
const hash = crypto.createHash('sha256').update(canonical).digest('hex');
const sts = 'AWS4-HMAC-SHA256\n'+dateStamp+'\n'+scope+'\n'+hash;
let sk = hmac('AWS4'+secretKey,shortDate);
sk = hmac(sk,region); sk = hmac(sk,'s3'); sk = hmac(sk,'aws4_request');
const sig = crypto.createHmac('sha256',sk).update(sts).digest('hex');
const url = 'https://'+host+'/'+bucket+'/'+key+'?X-Amz-Algorithm=AWS4-HMAC-SHA256&X-Amz-Credential='+encodeURIComponent(accessKey+'/'+scope)+'&X-Amz-Date='+dateStamp+'&X-Amz-Expires='+expires+'&X-Amz-SignedHeaders=host&X-Amz-Signature='+sig;
console.log(JSON.stringify({url:url,expires_in_seconds:expires}));
"
Replace YOUR_ACCOUNT_ID with your Cloudflare account ID.
Why Execute Command instead of Code? n8n's Code node runs in a sandbox that blocks process.env access. The Execute Command node runs on the host and can read your environment variables.Node 3: Respond to Webhook
Return the presigned URL as JSON.
---
Step 8: Test the Pipeline
Publish both workflows (toggle Active → on), then test:
# Generate an image
curl -X POST https://your-n8n-domain.com/webhook/openrouter-generate \
  -H "X-Auth-Token: your-secret" \
  -H "Content-Type: application/json" \
  -d '{"prompt": "A golden compass glowing with mystical light"}'

# Get a viewing link for the generated image
curl -X POST https://your-n8n-domain.com/webhook/r2-presigned-url \
  -H "X-Auth-Token: your-secret" \
  -H "Content-Type: application/json" \
  -d '{"key": "images/img-1780499452816.png"}'
You should see: a JSON response with a presigned URL. Paste it in your browser to view the image.
---
Common Problems and Fixes
Problem: "Forbidden" when testing the R2 credential
The region field is set to auto. Change it to us-east-1 in the n8n AWS credential. R2 accepts any valid AWS region for signing — it just needs one.
Problem: "No endpoints found" from OpenRouter
The model name is wrong. Check the exact name at openrouter.ai/models. Common mistake: google/gemini-2.5-flash-preview-image should be google/gemini-2.5-flash-image.
Problem: "Credentials not found" on execution
Credentials exist but aren't assigned to the node. Open the workflow in n8n UI, click each node, and manually select the correct credential from the dropdown. This step cannot be done programmatically.
Problem: Presigned URL workflow returns empty or errors
Check that R2_ACCESS_KEY_ID and R2_SECRET_ACCESS_KEY environment variables are set in your n8n hosting environment. If using Coolify, redeploy after adding them. Use the Execute Command node — the Code node's sandbox blocks env var access.
Problem: Image URL from OpenRouter expires after a few hours
This is expected behavior. Provider CDN links are temporary (1-24 hours). That's the entire reason for the R2 upload step — your copy in R2 is permanent. Always use the R2 presigned URL, not the original provider URL.
---
Quick Checklist
[ ] Cloudflare R2 enabled
[ ] Bucket created (private by default)
[ ] R2 API token created, scoped to one bucket only
[ ] n8n Header Auth credential created (X-Auth-Token)
[ ] n8n OpenRouter credential created (Bearer Auth or native)
[ ] n8n AWS/S3 credential created (region: us-east-1, custom endpoint set)
[ ] R2_ACCESS_KEY_ID env var set in n8n hosting
[ ] R2_SECRET_ACCESS_KEY env var set in n8n hosting
[ ] Generation workflow: credentials assigned to all nodes
[ ] Presigned URL workflow: account ID hardcoded, credentials assigned
[ ] OpenRouter spending limit set (safety net)
[ ] Both workflows published (active)
[ ] Test curl returns image confirmation
[ ] Presigned URL opens image in browser
---
What's Happening Under the Hood
Layer 1: Claude MCP     → sends your prompt to n8n via webhook
Layer 2: n8n workflow    → authenticates request, calls OpenRouter API
Layer 3: OpenRouter      → routes to best provider (Google, ByteDance, etc.)
Layer 4: Provider        → generates image, returns base64 data
Layer 5: n8n extraction  → converts base64 to binary PNG file
Layer 6: Cloudflare R2   → stores file in private bucket (zero egress cost)
Layer 7: Presigned URL   → generates a temporary signed link for viewing
Your images live in your own Cloudflare account. Not on OpenRouter's servers, not on the provider's CDN, not in a third-party gallery. You control access, retention, and visibility.
---
Cost Reference
Storage:            Free up to 10GB (Cloudflare R2 free tier)
Egress:             $0.00 (R2 has zero egress fees, always)
Image generation:   $0.013–$0.08 per image depending on model
Video generation:   $0.37–$1.00 per 5-second clip depending on model/quality
n8n hosting:        whatever you already pay for your VPS
At typical usage (20 images + 5 videos per week), expect roughly $5-10/month in OpenRouter API costs with zero storage or bandwidth charges.
---
Available Models (Image)
Check openrouter.ai/models for the current list. Some popular options at the time of writing:
google/gemini-2.5-flash-image    → $0.013/image (cheapest quality option)
google/gemini-2.5-pro-image      → ~$0.04/image
openai/gpt-image-1               → ~$0.04–$0.08/image
bytedance/seedream-3.0            → ~$0.04/image
Pass any model name in the model field of your request to switch between them.
---
*All views are my own. This guide is shared for learning and experimentation.*