
A simple guide for non-technical users
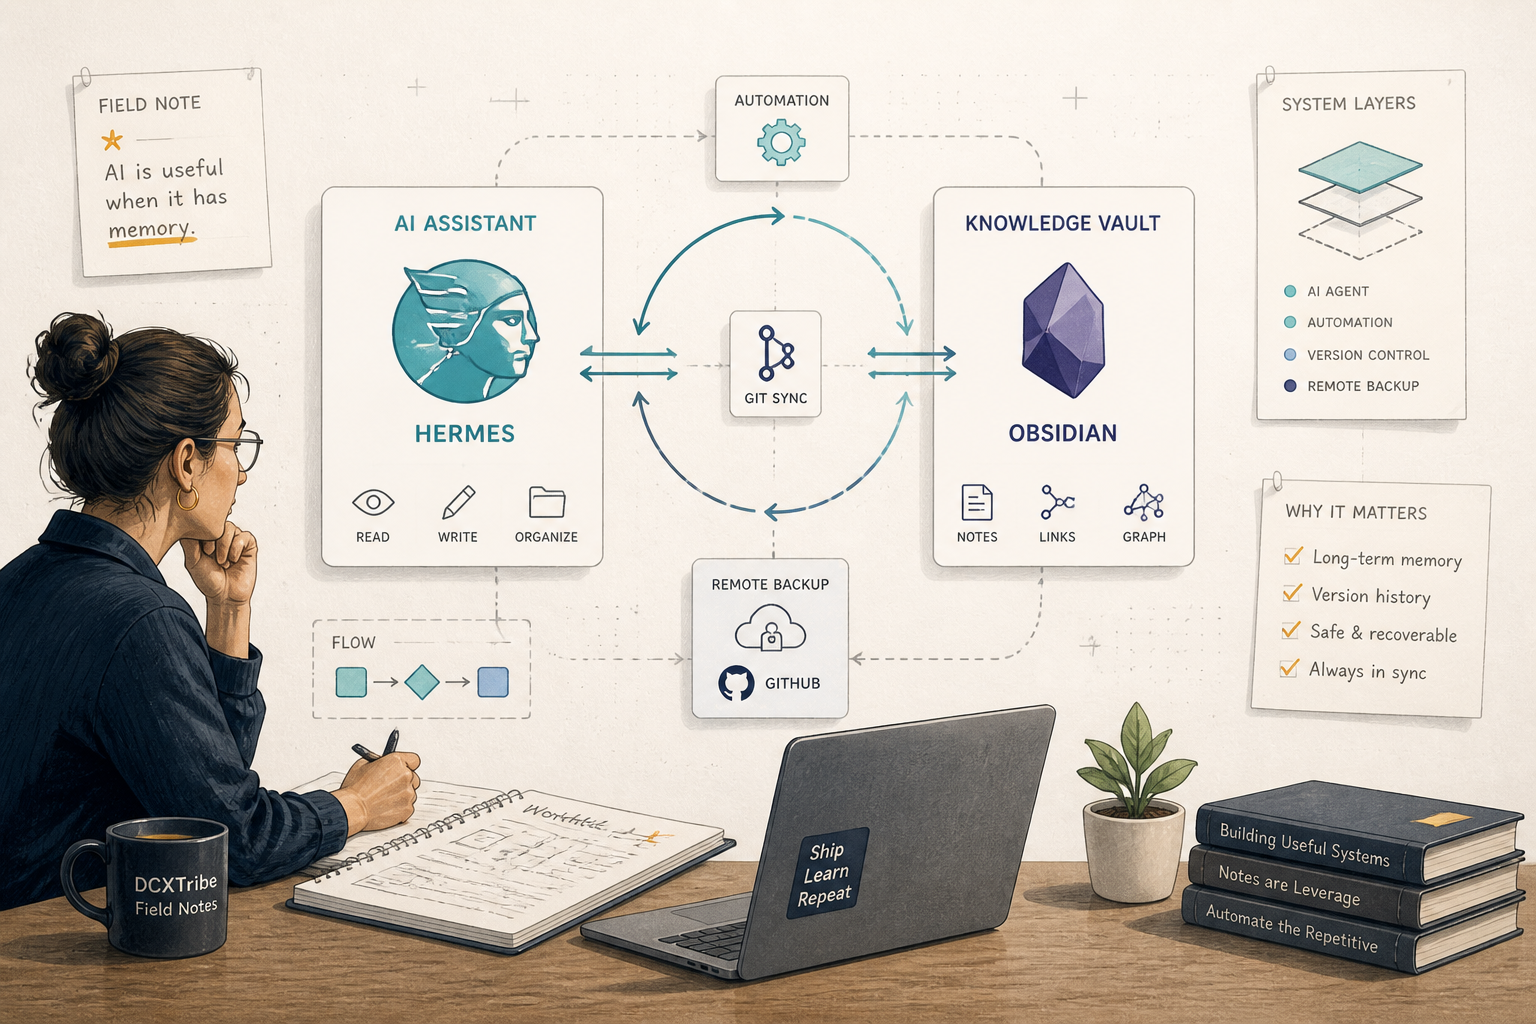
This guide explains how to connect Hermes to an Obsidian vault that is stored in GitHub.
The simple idea:
Obsidian is where your notes live.
GitHub is where your notes are backed up.
Hermes is the AI agent that can help organize, write, commit, and push updates.
This setup is useful if you want your AI agent to help manage your personal knowledge base.
---
What You Are Setting Up
The setup looks like this:
Hermes
→ Obsidian vault folder
→ Git
→ GitHub
In plain English:
Hermes works with your Obsidian notes folder. Git tracks the changes. GitHub stores a backup copy online.
This allows you to keep a structured vault for things like:
personal productivity
projects
content ideas
business research
investment research
vibe coding notes
daily notes
---
What You Need Before Starting
You need:
1. An Obsidian vault
2. A GitHub repository
3. Git installed in the Hermes environment
4. A way for Hermes to access GitHub
5. A clear folder structure for your notes
For GitHub access, you can use one of these:
Option 1: GitHub CLI
Option 2: SSH key
Option 3: GitHub personal access token
For non-technical users, GitHub CLI or SSH is cleaner long-term.
A personal access token works, but it must be handled carefully.
---
Important Security Note
A GitHub personal access token is like a password.
Do not publish it.
Do not paste it into public notes.
Do not include it in screenshots.
Do not commit it into your vault.
If you accidentally expose it, rotate or revoke it immediately.
In this guide, I will use:
GITHUB_PAT=REDACTED
Never use your real token in a public article.
---
Step 1: Create or Prepare Your GitHub Repo
You need a GitHub repo for your Obsidian vault.
Example placeholder:
https://github.com/ORG_OR_USER/vaultname.git
Your real repo may be private.
If the repo is private and Hermes is not authenticated, it may look like a 404.
That does not always mean the repo is missing.
It may simply mean:
Hermes does not have permission to see it yet.
---
Step 2: Clone the Vault Repo
From the Hermes terminal, run:
git clone https://github.com/ORG_OR_USER/vaultname.git
If the repo is private and Hermes is not authenticated, you may see:
fatal: could not read Username for 'https://github.com': No such device or address
This means Git needs authentication.
It is not an Obsidian problem.
It is a GitHub access problem.
---
Step 3: Check GitHub Access
First, check whether GitHub CLI exists:
gh --version
If you see:
gh: command not found
then GitHub CLI is not installed.
You can still use a token or SSH, but the process is less clean.
Also check SSH:
ssh -T git@github.com
If SSH is not set up, you may see:
Host key verification failed.
Again, this is an access issue.
Not an Obsidian issue.
---
Step 4: Authenticate Safely
For a cleaner setup, use one of these methods.
Option 1: GitHub CLI
gh auth login
This is usually easier if GitHub CLI is installed.
Option 2: SSH Key
Create an SSH key:
ssh-keygen -t ed25519 -C "your-email@example.com"
Then add the public key to GitHub.
After that, use an SSH repo URL:
git@github.com:ORG_OR_USER/vaultname.git
Option 3: Personal Access Token
Use a token only if you understand the security risk.
Keep it private.
Use a placeholder in documentation:
GITHUB_PAT=REDACTED
---
Step 5: Confirm the Vault Was Cloned
After cloning, you should have a folder like:
vaultname/
Inside, an Obsidian vault usually has:
vaultname/
├── .obsidian/
├── Welcome.md
└── other notes
If the vault uses the Obsidian Git plugin, you may also see:
.obsidian/plugins/obsidian-git/
This confirms:
The repo is cloned
The folder is an Obsidian vault
Obsidian settings are present
---
Step 6: Decide What the Vault Is For
Before asking Hermes to organize the vault, define its purpose.
Example:
personal productivity
vibe coding
business research
investment
This gives Hermes enough context to create a useful structure.
Without this step, the vault may become a random folder of notes.
---
Step 7: Create a Simple Vault Structure
A good beginner structure is:
vaultname/
├── Home.md
├── Projects.md
├── Investments.md
├── Business Research.md
├── Vibe Coding.md
│
├── 00 - Inbox/
├── 01 - Daily/
├── 02 - Projects/
├── 03 - Areas/
├── 04 - Resources/
├── 05 - Archive/
├── Templates/
└── Assets/
This is based on a simple system:
Inbox     → quick capture
Daily     → daily notes
Projects  → active work
Areas     → ongoing responsibilities
Resources → reusable knowledge
Archive   → completed or inactive items
Templates → reusable note formats
Assets    → images, attachments, files
---
Step 8: Add Project Folders
Inside 02 - Projects, create folders for your active work.
Example:
02 - Projects/
├── Project-A/
├── Project-B/
├── Content/
├── Research/
└── Personal/
A project folder can store:
briefs
drafts
meeting notes
research
decision logs
assets
checklists
The folder is not just storage.
It becomes the project’s memory.
---
Step 9: Add Resource Folders
Inside 04 - Resources, create folders for knowledge you reuse.
Example:
04 - Resources/
├── AI & Vibe Coding/
├── Business Research/
├── Investment/
├── Content Creation/
└── Tools & Systems/
Use this rule:
Projects = things I am actively moving
Resources = knowledge I may reuse
Areas = ongoing responsibilities
Archive = completed or inactive work
This keeps the vault easier to maintain.
---
Step 10: Add Templates
Templates help you avoid starting from a blank page.
Useful beginner templates:
Daily Note
Project Note
Meeting Note
Investment Research
Business Research
Vibe Coding Session
Example structure:
Templates/
├── Daily Note.md
├── Project.md
├── Meeting.md
├── Investment Research.md
├── Business Research.md
└── Vibe Coding Session.md
Templates create consistency.
They also help Hermes write cleaner notes later.
---
Step 11: Configure Obsidian Settings
Basic settings:
Daily notes folder → 01 - Daily/
Attachments folder → Assets/
Templates folder → Templates/
If using Obsidian Git plugin, make sure it is enabled in Obsidian.
But remember:
The Obsidian Git plugin alone does not prove Git sync works.
You still need to test:
commit
push
pull
remote update
---
Step 12: Check Git Status
Before committing, always run:
git status
This shows what changed.
This matters even more when an AI agent created files for you.
You want to know:
What files were added?
What files were deleted?
What files were modified?
Do not commit blindly.
---
Step 13: Configure Git Identity
Fresh servers often do not know who is making the commit.
If you try to commit and see:
Author identity unknown
set Git identity.
Repo-local is safer:
git config user.name "Your Name"
git config user.email "you@example.com"
Global is also possible:
git config --global user.name "Your Name"
git config --global user.email "you@example.com"
For personal AI-agent setups, repo-local is usually cleaner.
---
Step 14: Commit the Vault Changes
After checking git status, commit the changes:
git add .
git commit -m "Initialize vault structure, templates, and dashboards"
A successful commit means Git has saved a version of your vault locally.
But it is not yet backed up to GitHub until you push.
---
Step 15: Push to GitHub
Run:
git push origin main
If the push succeeds, you should see something like:
main -> main
That means your local vault changes are now in GitHub.
The full working chain is:
Hermes edits vault
→ Git tracks changes
→ Commit saves local version
→ Push sends changes to GitHub
---
Step 16: Open the Vault in Obsidian
Open Obsidian.
Choose:
Open folder as vault
Select your vault folder.
Example:
/opt/data/vaultname
You should now see your folders, notes, templates, and dashboards.
---
Working Chain
The final working chain should look like this:
GitHub repo
→ cloned vault folder
→ Obsidian vault structure created
→ templates and dashboards added
→ Git identity configured
→ commit created
→ push completed
→ GitHub remote updated
In simple terms:
GitHub
→ Obsidian vault
→ Hermes edits
→ Git commit
→ GitHub sync
---
Common Problems and Simple Fixes
Problem: Repo shows 404
Possible reasons:
Repo does not exist
Repo is private
Wrong URL
Hermes is not authenticated
Do not assume it is missing immediately.
Check authentication first.
---
Problem: Clone fails
If you see:
could not read Username
Git needs authentication.
Use GitHub CLI, SSH, or a token.
---
Problem: GitHub CLI is missing
If you see:
gh: command not found
then GitHub CLI is not installed.
Use SSH or token-based access instead.
---
Problem: Commit fails
If you see:
Author identity unknown
configure Git identity:
git config user.name "Your Name"
git config user.email "you@example.com"
---
Problem: Push fails
If push fails, check:
Is the remote URL correct?
Is authentication working?
Is the token valid?
Is SSH configured?
Does the server have permission?
---
Safety Rule for AI Agents
Before giving an AI agent access to your vault or repo, set a hard rule:
Do not delete any Git repository without asking me three times.
The stronger version:
Three-strike repo deletion protocol:

1. Ask once — explain exactly what will be lost
2. Ask again — ask me to reconsider
3. Ask a final time — require explicit confirmation
This matters because repositories are long-term memory.
An AI agent should not delete them casually.
---
Beginner Checklist
Use this checklist:
[ ] GitHub repo created
[ ] Repo URL confirmed
[ ] GitHub authentication ready
[ ] Repo cloned successfully
[ ] .obsidian folder exists
[ ] Vault purpose defined
[ ] Folder structure created
[ ] Templates created
[ ] Obsidian settings configured
[ ] git status checked
[ ] Git identity configured
[ ] Changes committed
[ ] Changes pushed to GitHub
[ ] Vault opened in Obsidian
[ ] Deletion safety rule added
---
Simple Explanation
This setup has five layers:
Vault layer      → your Obsidian notes
Structure layer  → folders and templates
Git layer        → tracks changes
GitHub layer     → stores backup online
Hermes layer     → helps create, edit, and organize
If something breaks, do not debug everything at once.
Check one layer at a time.
---
Final Note
This setup looked like an Obsidian task.
It was actually a Git operations task.
The real journey was:
Clone failed
Repo looked like 404
GitHub CLI missing
SSH not ready
Token used
Clone worked
Vault inspected
Structure created
Commit failed
Git identity fixed
Push failed
Token handling adjusted
Push worked
Deletion guardrail added
That is the useful lesson.
Obsidian is the note-taking layer.
Git is the memory and versioning layer.
Hermes is the assistant that can help maintain the system.
When all three work together, the vault becomes more than a place to store notes.
It becomes a living workspace.
All views are my own. This guide is shared for learning and experimentation.