
A simple guide for non-technical users
This guide explains how to set up Hermes as your personal AI agent on Coolify, configure the AI model correctly, and connect Hermes to Telegram so you can use it from your phone.
The goal is simple:
Run Hermes on a server
→ configure the AI model properly
→ test Hermes in the terminal
→ connect Telegram
→ use Hermes as a reachable personal AI agent
This guide is written for users who are comfortable following steps but do not want a deeply technical explanation.
---
What Is Hermes?
Hermes is an AI agent framework.
In simple terms:
Hermes is not just a chatbot.
Hermes is an AI agent that can connect to tools, skills, gateways, and workflows.
You can use Hermes for things like:
chatting with an AI model
connecting to Telegram
using tools and skills
setting up automation
working with notes
connecting to services like Spotify
supporting vibe coding workflows
The key thing to understand:
Hermes is more than an OpenAI-compatible API proxy. It has its own configuration system.
That was one of the biggest lessons from my setup.
---
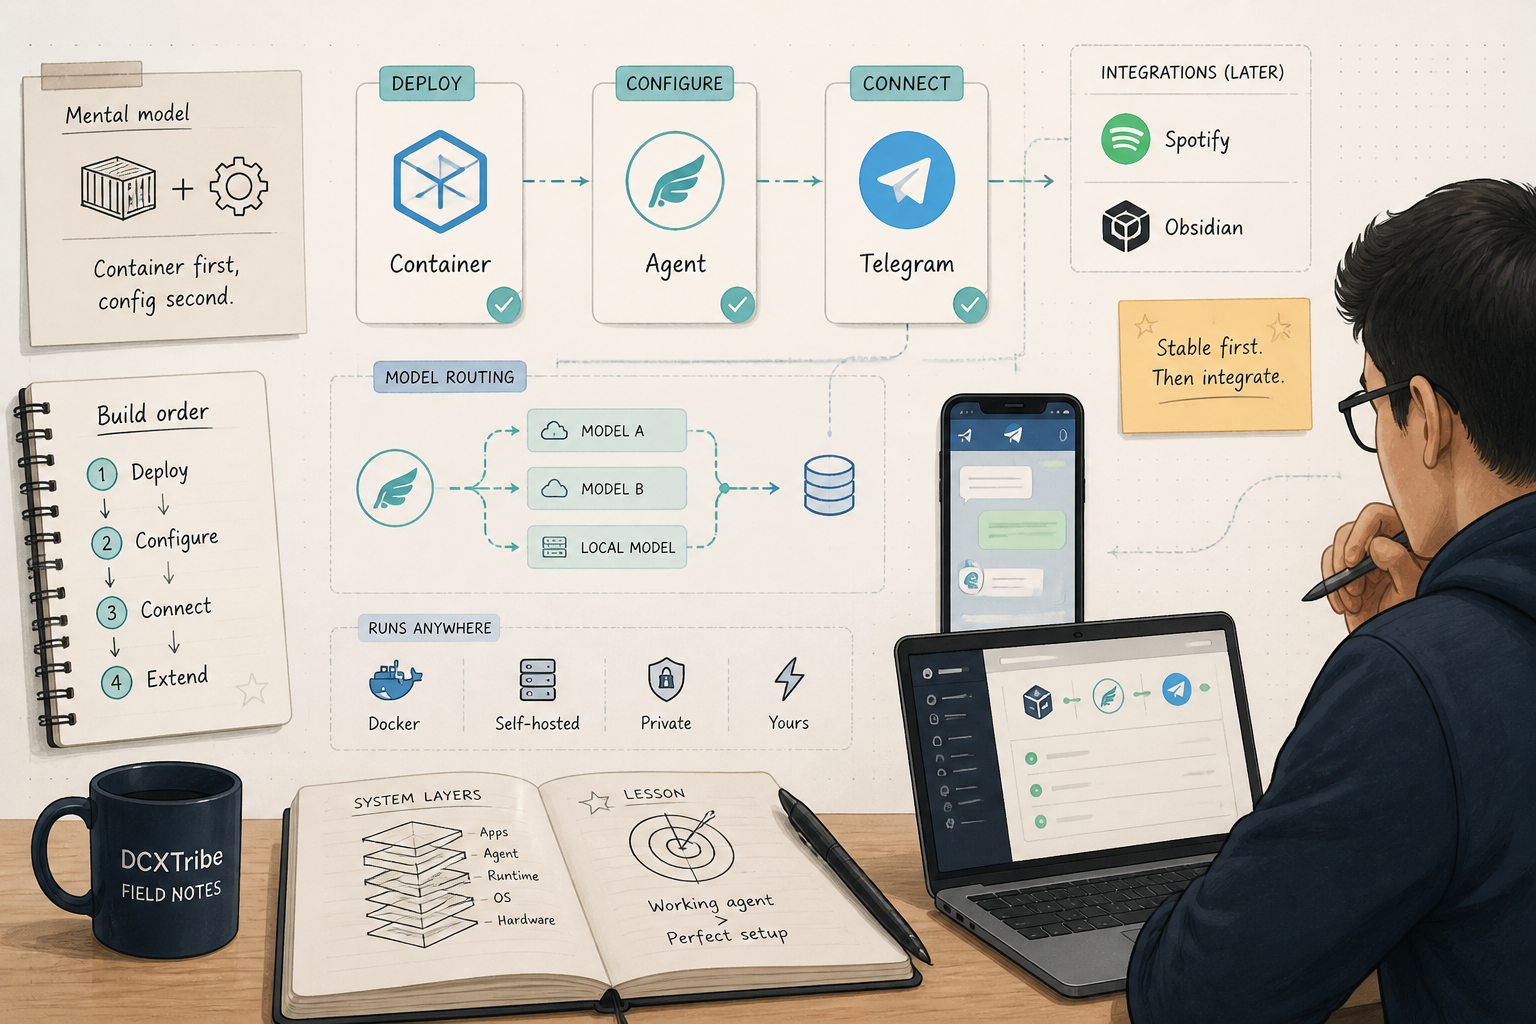
The Important Mental Model
At first, I treated Hermes like a normal Docker app.
I assumed this flow:
Set environment variables
→ restart container
→ Hermes uses those settings
That assumption caused problems.
The better mental model is:
Coolify runs the container.
Hermes configures Hermes.
So Coolify is mainly used to:
start Hermes
restart Hermes
keep Hermes running
persist Hermes data
expose the port
Hermes itself should be configured using Hermes commands such as:
hermes model
hermes config
hermes chat
hermes gateway setup
That small shift makes the setup much cleaner.
---
What You Need Before Starting
You need:
1. A server or VPS
2. Coolify installed
3. A working domain or app route if needed
4. A model provider such as OpenRouter
5. An API key for your chosen model provider
6. Basic access to the Coolify terminal
7. Telegram account if you want phone access
Optional:
Spotify setup
Obsidian vault setup
GitHub setup
voice mode
other Hermes skills
Start with the basic Hermes setup first.
Do not connect everything at once.
---
Recommended Setup Order
Use this order:
1. Create Hermes service in Coolify
2. Start with minimal Docker Compose
3. Open terminal inside the container
4. Configure model using hermes model
5. Verify config using hermes config
6. Test using hermes chat
7. Restart from Coolify
8. Connect Telegram
9. Test Telegram
10. Add skills and workflows later
The order matters.
Do not test Telegram before Hermes works in the terminal.
Do not add Spotify before Hermes model routing works.
Do not add too many skills before the base agent is stable.
---
Step 1: Create a Hermes App in Coolify
In Coolify:
1. Go to your project
2. Create a new resource
3. Choose Docker Compose
4. Paste the Hermes compose file
5. Deploy
Use a minimal compose file first.
---
Step 2: Use Minimal Docker Compose
Start with this:
services:
  hermes:
    image: 'nousresearch/hermes-agent:latest'
    restart: unless-stopped
    command: [gateway, run]
    ports:
      - '8642:8642'
    volumes:
      - 'hermes_data:/opt/data'

volumes:
  hermes_data:
That is enough for the base setup.
The important part is:
hermes_data:/opt/data
This keeps Hermes state after restarts.
Do not start with a large environment: block full of guessed variables.
The earlier mistake was using variables like:
HERMES_INFERENCE_PROVIDER
HERMES_INFERENCE_MODEL
HERMES_MODEL
OPENAI_API_KEY
OPENAI_BASE_URL
OPENROUTER_API_KEY
They looked reasonable, but Hermes model routing did not use them the way I expected.
The cleaner approach:
Use Coolify to run Hermes.
Use Hermes commands to configure Hermes.
---
Step 3: Deploy the Container
After adding the compose file, deploy the app in Coolify.
Wait until the service is running.
If Coolify shows the app as healthy, that only means the container is running.
It does not yet prove that Hermes is using the right model.
---
Step 4: Open the Coolify Terminal
Open the terminal inside the Hermes container.
This is where you configure Hermes.
Try:
hermes
If you see:
hermes: command not found
then Hermes may not be in the default path.
Try the full path:
/opt/hermes/.venv/bin/hermes
or check where Hermes exists:
which hermes
In some setups, useful paths may include:
/opt/hermes/.venv/bin/hermes
/opt/hermes/hermes
---
Step 5: Configure the Model
Run:
hermes model
This opens the model setup flow.
Choose your provider and model.
Example:
Provider: OpenRouter
Model: deepseek/deepseek-v4-flash
Your provider and model may be different.
The important lesson is:
Do not guess the config keys manually at first. Let Hermes write the correct configuration through its own setup flow.
---
Step 6: Verify the Real Config
Run:
hermes config
This is one of the most important commands.
It shows what Hermes has actually loaded.
Not what you think is configured.
Not what the Docker Compose file suggests.
Not what an environment variable name implies.
What Hermes is actually using.
That difference matters.
If something looks wrong here, fix this first before testing Telegram or any skill.
---
Step 7: Restart Hermes from Coolify
After configuring the model, restart Hermes from Coolify.
This helps Hermes reload cleanly.
Then open the terminal again.
---
Step 8: Test Hermes Chat Inside the Container
Run:
hermes chat
Send a simple test message:
Say hello in one sentence.
A successful response proves:
Hermes is running
Hermes can reach the model provider
Hermes is using the selected model
The model can reply
This is the first important success point.
The working chain is:
You
→ Hermes
→ model provider
→ selected model
→ Hermes
→ You
Do not move to Telegram until this works.
---
Step 9: Optional API Health Check
You can check the health endpoint:
curl -i --max-time 10 http://127.0.0.1:8642/health
A healthy response means the service is alive.
But remember:
Health check working
does not mean
model routing is correct
The better proof is still:
hermes chat
---
Step 10: Connect Telegram
Once Hermes works in the terminal, you can connect Telegram.
Telegram turns Hermes from a server tool into something you can use from your phone.
The flow looks like this:
Telegram app
→ Telegram bot
→ Hermes gateway
→ Hermes agent
→ model provider
→ reply back to Telegram
---
Step 11: Create a Telegram Bot
On your phone:
1. Open Telegram
2. Search for @BotFather
3. Send /newbot
4. Give your bot a name
5. Give it a username ending with bot
6. Copy the bot token
Keep the bot token private.
Do not publish it.
Use this placeholder in notes:
TELEGRAM_BOT_TOKEN=REDACTED
---
Step 12: Get Your Telegram User ID
Hermes needs your numeric Telegram user ID.
This is not the same as your Telegram username.
Use a Telegram user info bot to find your numeric ID.
Use this placeholder in notes:
TELEGRAM_USER_ID=REDACTED
---
Step 13: Run Hermes Gateway Setup
Inside the Hermes container terminal, run:
hermes gateway setup
Choose:
Platform: Telegram
Bot token: your Telegram bot token
User ID: your numeric Telegram user ID
Home channel: your direct message with the bot
The “home channel” means:
Where should Hermes send messages when it needs to talk to me?
For a personal setup, the answer is your direct chat with the Telegram bot.
---
Step 14: Restart Hermes Again
After gateway setup, restart Hermes in Coolify.
Then open Telegram.
Find your bot.
Press Start.
Send:
Hello, can you hear me?
If Hermes replies, Telegram is working.
---
Step 15: Voice Mode
Hermes can also support voice-style interaction depending on your setup.
Useful commands may include:
/voice tts
/voice on
/voice off
Simple explanation:
/voice tts  → text replies can become voice messages
/voice on   → voice mode on
/voice off  → return to text mode
Voice is useful when you are thinking, walking, or away from your desk.
But do not configure voice before the basic Telegram chat is working.
---
Working Chain
The full working chain looks like this:
Coolify
→ Hermes container
→ /opt/data persistent state
→ hermes model configuration
→ hermes config verification
→ hermes chat test
→ Telegram gateway
→ Telegram bot on phone
→ Hermes replies anywhere
In simpler terms:
Server agent
→ configured model
→ tested terminal chat
→ Telegram access
→ personal AI assistant
---
Common Problems and Simple Fixes
Problem: The container is running but Hermes does not use the right model
Run:
hermes config
Check what Hermes actually loaded.
Do not rely only on Docker environment variables.
---
Problem: `hermes` command not found
Try:
/opt/hermes/.venv/bin/hermes
or:
/opt/hermes/hermes
Then use the full path if needed.
---
Problem: Health check works but chat fails
This means the container is alive, but model routing may be wrong.
Check:
hermes config
hermes model
hermes chat
---
Problem: Telegram bot does not reply
Check:
Was the bot token copied correctly?
Did you press Start in Telegram?
Did you use the numeric Telegram user ID?
Was Hermes restarted after gateway setup?
Does hermes chat work inside the container?
Do not debug Telegram until terminal chat works.
---
Problem: Too many things are failing at once
Reduce the layers.
Use this sequence:
1. Container starts
2. Hermes config resolves correctly
3. Hermes chat works
4. API endpoint responds
5. Telegram works
6. Voice works
7. Skills work
Layer by layer.
---
Beginner Checklist
Use this checklist:
[ ] Coolify app created
[ ] Minimal Docker Compose used
[ ] /opt/data persisted
[ ] Hermes container started
[ ] Coolify terminal opened
[ ] hermes model completed
[ ] hermes config checked
[ ] Hermes restarted
[ ] hermes chat tested
[ ] Telegram bot created
[ ] Telegram user ID obtained
[ ] hermes gateway setup completed
[ ] Hermes restarted again
[ ] Telegram bot tested
[ ] Voice tested only after Telegram works
---
Safety Notes
Hermes can become powerful as you add skills and tools.
Start safely.
Recommended rules:
Do not connect everything at once.
Do not give destructive access too early.
Do not paste secrets into public notes.
Do not publish API keys or bot tokens.
Do not delete repositories without repeated confirmation.
A good deletion rule:
Three-strike repo deletion protocol:

1. Ask once — explain exactly what will be lost
2. Ask again — ask me to reconsider
3. Ask a final time — require explicit confirmation
Agents are useful because they can act.
But action needs boundaries.
---
What To Add After Basic Setup
Once Hermes works, you can add more:
Spotify
Obsidian
GitHub workflows
content curation
website audit
YouTube transcript summaries
coding agents
PowerPoint generation
voice workflows
scheduled tasks
But add them one at a time.
Each new integration adds a new layer.
Test each layer before adding the next.
---
Simple Explanation
Hermes setup has four layers:
Container layer  → Is Hermes running?
Config layer     → Is Hermes using the right model?
Gateway layer    → Can I reach Hermes from Telegram?
Workflow layer   → Can Hermes do useful work?
Most setup problems happen when we confuse one layer for another.
A green container does not mean correct config.
Correct config does not mean Telegram works.
Telegram working does not mean every skill is loaded.
Check one layer at a time.
---
Final Note
The biggest lesson from my Hermes setup was this:
Do not treat Hermes like a simple Docker app.
Use Docker and Coolify to run it.
Use Hermes to configure it.
The most important command was:
hermes config
Run it early.
Run it before guessing.
Run it before rewriting the compose file.
The boring middle is where the real setup happens.
Once that foundation is right, the exciting parts become easier: Telegram, voice, Spotify, Obsidian, and future agent workflows.
All views are my own. This guide is shared for learning and experimentation.